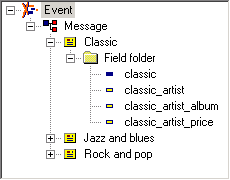
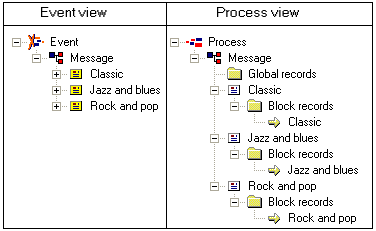
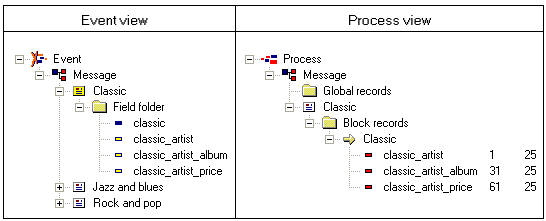
In this example, you have the Event configuration in Example 1, and want the StreamServer to generate output according to Example 2.
|
Example 1
|
|
Example 2
|
|
1
|
|
2
|
Select Fixed field positions, New line at end of record, and Carriage return and line feed (CR + LF) and click OK.
|
|
1
|
Drag the Classic block from the Event view, and drop it on the Message node in the Process view. The Classic block, including a block record, is added below the Message node.
|
|
2
|
|
1
|
Drag the classic_artist field from the Classic block in the Event view, and drop it on the Classic record in the Process view.
|
|
2
|
Drag the classic_artist_album field from the Classic block in the Event view, and drop it on the classic_artist field in the Process view.
|
|
3
|
Drag the classic_artist_price field from the Classic block in the Event view, and drop it on the classic_artist_album field in the Process view.
|
|
1
|
Right-click the classic_artist field and select Edit Start Position. The corresponding field in the Pos column in the Process view is write enabled.
|
|
2
|
Enter 1 as start position.
|
|
3
|
Right-click the classic_artist field and select Edit Width. The corresponding field in the Width column in the Process view is write enabled.
|
|
4
|
Enter 25 as width.
|
|
5
|
Repeat steps 1 - 4 for the fields classic_artist_album and classic_artist_price, and set the start position to 31 and 61 respectively.
|
|
1
|
Right-click the Classic block and select Insert Before First Instance Block. A Before_Classic block is added to the Classic block.
|
|
2
|
Right-click the Classic block and select Insert After Last Instance Block. An After_Classic block is added to the Classic block.
|
|
1
|
Right-click the Before_Classic block and select Insert Record. A new record is added to the Before_Classic block.
|
|
2
|
Right-click the new record and select Insert Static Text. A new static text object is added to the record.
|
|
4
|
|
5
|
Right-click the text object and select Edit Start Position. The corresponding field in the Pos column in the Process view is write enabled.
|
|
6
|
Enter 62 as start position.
|
|
7
|
Right-click the text object and select Edit Width. The corresponding field in the Width column in the Process view is write enabled.
|
|
8
|
Enter 20 as width.
|
|
9
|


