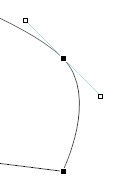
In point editing mode, you can control each corner point of a shape by dragging it into its desired position using four different path types. Each path type has nodes where each node has three points, where one is the central knot point and two are control points. Two lines connect the two control points with the knot point. You can use these three points to create a free form. By default, all three points are in the same position, that is no lines are visible.
|
Be careful when using non-rectangular text areas or Story frames that include tables in separate paragraphs.
|
|
Example 16
|
The black square between the two tangential lines is the knot point, and the white squares at the end points of the line are control points.
|
•
|
Smooth – The knot point is in the middle of the tangent line.
|
|
•
|
Straight – The knot point is shifted from the middle of the tangent lines depending on the free form.
|
|
•
|
Angle – The line connecting the control points is split at the knot point, i.e. you can control one control point without affecting the other side.
|
|
•
|
Point – The tangent lines are collapsed to the corner, so no line is visible (default).
|
Right-click the selected object and select Edit Points.
Right-click the selected object and select Close Edit Points.
|
2
|
In point editing mode, grab a segment where you want to create the knot point and drag it to the desired location.
|
2
|


