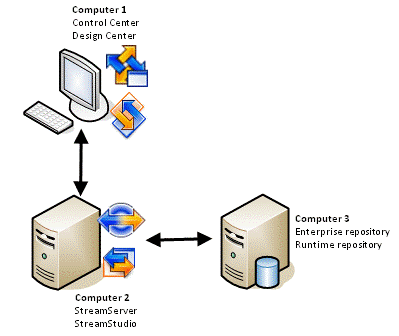
In this example, Company ABC Ltd is planning a StreamServe installation that will use three computers to host different StreamServe components.

This computer will be used to develop StreamServe Projects and administer StreamServe applications.
This computer will run StreamServer applications and the StreamStudio web applications. Apache Tomcat 6.0 is already installed on this computer.
Microsoft SQL Server 2008 R2 (64-bit) is running on this computer. The StreamServe Enterprise Repository and runtime repository will be created on this computer.
These instructions describe how to install the StreamServe components on each of the computers and how to create the enterprise repository.
Before StreamServer or StreamStudio applications can be run, further configurations are required. These are described in Control Center documentation.
|
•
|
Confirm the software and hardware that is required for each StreamServe component that will be installed on each computer. See Database requirements for StreamServe repositories.
|
|
•
|
|
•
|
|
Hostname\instance name
|
computer_3 |
sa |
|
Kanelbulle15 |
|
2
|
Select SQL Server Network Configuration > Protocols for MSSQLSERVER > TCP/IP. The TCP/IP Properties dialog opens.
|
|
3
|
|
4
|
Click IP Addresses tab and do the following
|
|
5
|
Click OK to close the TCP/IP Properties dialog.
|
|
6
|
Click SQL Native Client Configuration > Client Protocols > TCP/IP. The TCP/IP Properties dialog opens.
|
|
7
|
|
1
|
From the installation CD, double-click the mssetup.exe file. The OpenText StreamServe Setup opens.
|
|
2
|
Click Framework and StreamServer (x64).
|
|
4
|
A message displays prompting you to reboot your computer. Click OK, Finish, and reboot the computer.
|
|
5
|
|
7
|
On the Framework and StreamServer - Destination Folder page, click Next to install the files in the default folder.
|
|
8
|
On the Management Gateway - Location of base directory page, click Next, to use the default location for the working directory for StreamServe Projects.
|
|
10
|
On the Completed page, click Finish.
|
The next step is to install StreamStudio on computer_2.
|
1
|
From the OpenText StreamServe Setup, click StreamStudio.
|
|
2
|
|
5
|
On the Completed page, click Finish.
|
|
6
|
Click Exit to close the OpenText StreamServe Setup.
|
|
1
|
From the installation CD, double-click the mssetup.exe file. The OpenText StreamServe Setup opens.
|
|
2
|
Click Control Center. A page opens, which lists the third-party software Control Center requires.
|
|
3
|
Click Install to install the software
|
|
4
|
Click Yes to install Java Standard Edition Version 6.0 Update 29 32-bit.
|
|
5
|
Open OpenText StreamServe Setup again and click Control Center.
|
|
6
|
|
7
|
On the Control Center - Destination page, click Next to accept the default installation path.
|
|
8
|
On the Ready to Install page, click Install.
|
|
9
|
On the Completed page, click Finish.
|
Design Center can now be installed on computer_1.
|
1
|
From the OpenText StreamServe Setup, click Design Center.
|
|
2
|
|
4
|
|
5
|
Click Next to accept the default location for the Design Center installation files.
|
|
6
|
On the Update log page, click Install.
|
|
7
|
On the Completed page, click Finish.
|
|
8
|
Click Exit to close the OpenText StreamServe Setup.
|
You use Control Center installation on computer_1 to configure the connection settings for the enterprise repository and create the database for enterprise repository. To do this you need to connect to the management gateway on computer_2. The following steps are required:
|
1
|
|
2
|
|
3
|
In the New site dialog box, enter the following settings
|
|
–
|
Site name – ABC_Production
|
|
–
|
Host name – computer_2
|
|
4
|
Click OK to continue.
|
|
5
|
|
6
|
|
–
|
Database vendor – SQL Server
|
|
–
|
Host name – computer_3
|
|
–
|
Port – 1433
|
|
–
|
Database name – StrsSER
|
|
–
|
User name – StrsSERAccess
|
|
–
|
Password – StrsSER456
|
|
1
|
|
2
|
In the Connect dialog box, enter the login details for the Management Gateway Administrator (Administrator and strs_password), and click OK.
|
|
3
|
|
4
|
In the Connect dialog box, enter the following login details for the database administrator and click OK:
|
|
–
|
User name – sa
|
|
–
|
Password – Kanelbulle15
|
|
5
|
Review the Result log and click Close to close the Create Database dialog.
|
Before you can run StreamServer or StreamStudio applications you must make further preparations. These preparations are described in the Control Center documentation.
|
•
|
The preparations required to run StreamServer applications, see StreamServer configurations in the Control Center documentation.
|
|
•
|
The preparations required to run StreamStudio applications, see StreamServe web application configurations in the Control Center documentation.
|
|
•
|
The preparations required to run Collector, see StreamStudio Collector configurations in the Control Center documentation.
|
|
•
|
The preparations required to run Composition Center, see StreamStudio Composition Center configurations in the Control Center documentation.
|
